

Home inspectors juggling a printed radon report and a digital inspection platform lose ten minutes per file re-typing pCi/L numbers into a summary page that already has room for an attachment. Instead of manually forwarding a radon PDF in a separate email and hoping the buyer's agent matches it to the right property, upload the report inside your inspection software's Attachments or Documents tab so it travels with the rest of the inspection record from the moment you close the file.
- Attaching a radon test report to your inspection software takes under 5 minutes once the file is saved and named correctly.
- Michigan Radon Control delivers a lab-generated PDF formatted to drop directly into Spectora, HomeGauge, ISN, or Home Inspector Pro.
- Naming the file with the property address before uploading prevents mismatched reports on multi-property inspection days.
- Buyers and agents expect radon results inside the same report portal as the general inspection findings in 2026, not a second email.
Why this matters
A radon result that arrives as a standalone email gets lost the moment a closing timeline tightens. Agents forward inspection reports as a single PDF link, and if the radon page isn't inside that file, it's the one document nobody can find during a Friday afternoon closing.
Home inspectors who partner with a testing provider on radon testing partnerships for Michigan home inspectors already get the lab report as a clean PDF. The remaining step — getting that PDF into the same platform the buyer already trusts — is the part most inspectors do manually, every single time, instead of setting it up once.
Before you start
- A completed radon test report as a PDF (Michigan Radon Control emails the lab-generated report directly, no scanning required).
- Active login access to your inspection software's report editor — Spectora, HomeGauge, ISN, Home Inspector Pro, or whatever platform you run your business on.
- The property address in the radon report file name matched exactly to the inspection record already open in the platform.
- The gotcha: several platforms auto-compress PDFs on upload and strip embedded charts or lab letterhead in the process. Export the radon report as a flattened, single-layer PDF before attaching it — not a scanned multi-page TIFF or a screenshot stitched into a Word doc, both of which get rejected or rendered blank by compression.
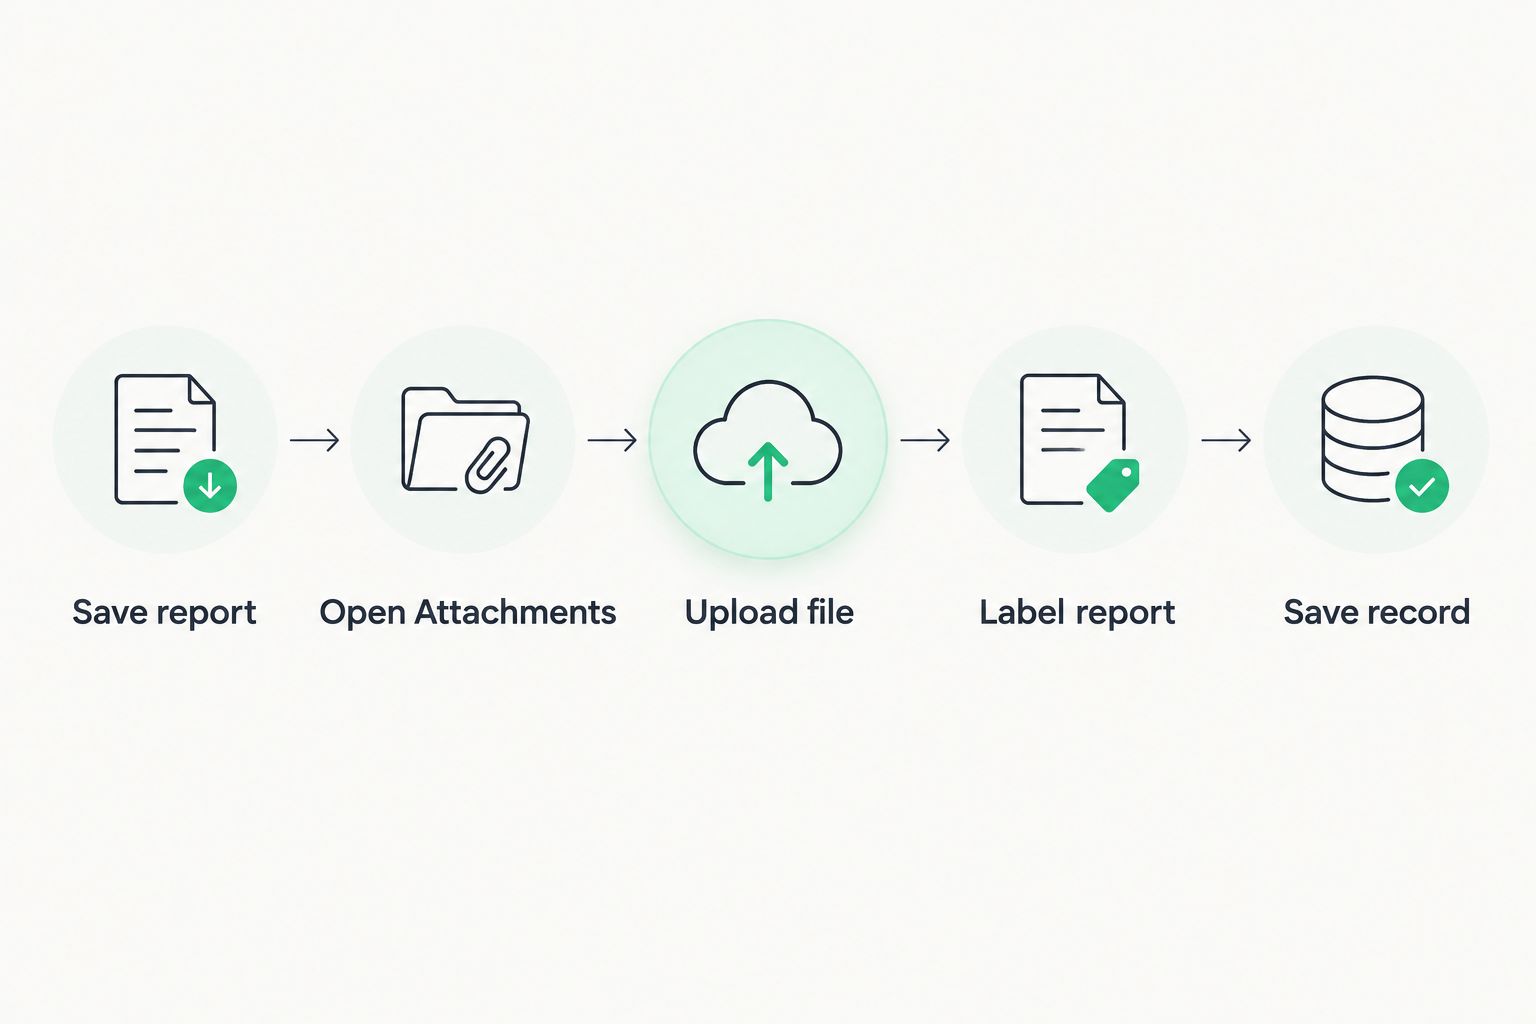
Save the radon report as a ready-to-upload file
- Download the PDF from the lab or testing provider's email the moment it lands — don't let it sit in an inbox where it gets buried under the next day's schedule.
- Rename the file using the property street address and test end date (example:
123-Maple-St-Radon-021226.pdf). Inspectors running four or five properties a week lose files constantly when everything is still namedreport.pdf. - Open the file once before uploading and confirm the pCi/L result is visible on the first page. A corrupted download shows as a blank page or a file-size error — catch it now, not after the client calls asking where the radon section went.
Expected result: one correctly named PDF, verified readable, sitting in a folder you can find in two clicks.
Attach the report inside your inspection software
- Open the inspection record for the property in your software's dashboard.
- Navigate to the Attachments or Documents tab — most platforms place this next to the main report editor, not buried in account settings.
- Click Add File or Upload Document and select the renamed radon PDF from your device.
- Label the uploaded file something explicit — "Radon Test Report" or "Radon Test Report – [pCi/L result]" — rather than leaving the platform's default filename in place.
- Save the record. Most platforms auto-generate a shareable link at this point; copy it if you plan to send the report separately to the listing agent.
Expected result: the radon PDF appears in the client-facing report package alongside photos and the summary narrative, without a second email required.
Reference the result on the summary page
- Open the report's Summary or Additional Findings section — the page a buyer reads first, before scrolling through 40 pages of photos.
- Add one line noting the radon result and a plain-language flag: at or below 4 pCi/L, above 4 pCi/L, or pending lab confirmation.
- Link the note to the attached PDF if your platform supports inline document links, so a reader can click straight to the full report instead of hunting for it in the attachments list.
Homeowners and agents scan the summary page first. Getting the radon number there — not just buried in an attachment — is what actually gets read. If you need a refresher on what the number itself means, how to read your radon test results breaks down pCi/L thresholds in plain terms.
Attach a continuous monitor readout instead of a lab PDF
Some inspections use a continuous radon monitor rather than a mailed lab test, especially on short-turnaround closings. The workflow is nearly identical, with one difference:
- Export the monitor's session data as a PDF or CSV directly from its companion app rather than photographing the device screen.
- Confirm the export includes the test start and end timestamps — closing agents and appraisers frequently ask for this to confirm the 48-hour minimum test window was met.
- Upload and label the file the same way as a lab PDF: "Radon Monitor Readout" plus the result, in the Attachments tab.
This matters more than it sounds like it should — a monitor export missing a timestamp gets questioned by underwriters more often than a lab report does.
Troubleshooting attachment problems
- The PDF uploads but shows blank on the client portal. The file was likely a scanned image saved at too high a resolution. Re-export as a standard flattened PDF under 10MB.
- The platform rejects the file type. Some inspection software only accepts PDF and JPG, not PNG or HEIC. Convert before uploading rather than fighting the upload dialog.
- The radon result doesn't match the property in the client's confirmation email. This almost always traces back to a generic file name — go back to step one and rename with the address.
- The summary page note saved but the linked attachment is missing. Most platforms require the file to finish uploading before you save the summary section; save the attachment first, then edit the summary.
- The agent says they never received the radon section. Check whether your platform generates a separate share link for attachments versus the main report — some do, and it's easy to send only the main link.
Build this into your standard closing workflow
Once the radon PDF lives inside the inspection platform, the same attachment habit extends to other documents buyers and agents ask for at closing — mold reports, well water results, or a second radon test scheduled closer to the closing date. Inspectors working real estate deals on tight timelines should look at best radon testing companies for real estate closings in Michigan for providers whose report turnaround matches typical 2026 closing windows.
The inspectors who standardize this — same file naming, same attachment tab, same summary-line format — stop treating radon as an afterthought attachment and start treating it as a normal part of the report package, which is what buyers and lenders expect by 2026.
Partner on radon testing for your inspections
Lab-formatted reports built to drop straight into your inspection software.
FAQ
Can you attach a radon test report to Spectora or HomeGauge directly?
Yes. Both platforms have a Documents or Attachments tab inside each inspection record where you upload a PDF and label it. The radon PDF then appears in the client-facing report alongside photos and findings.
What file format does a radon report need to be for upload?
A flattened PDF works with nearly every inspection platform. Scanned images or multi-page TIFFs often get compressed or rejected, so convert to standard PDF before uploading.
Does the radon result need to go on the summary page too, not just as an attachment?
Yes. Buyers and agents read the summary page first and often never open every attachment. A one-line note with the pCi/L result and a flag above or below 4.0 gets read even when the full PDF doesn’t.
How do you attach a continuous radon monitor readout instead of a lab report?
Export the session data as a PDF or CSV from the monitor’s app, confirm the test start and end timestamps are included, and upload it the same way as a lab PDF under a clear label.
Why does the radon PDF show up blank after uploading?
This usually happens when the file was a high-resolution scan rather than a flattened PDF. The platform’s compression strips the content. Re-export the report as a standard PDF under 10MB and re-upload.
Is it better to send the radon report as a separate email or attach it in the inspection software?
Attaching it inside the software keeps the result with the rest of the inspection record, which is what agents and lenders expect to find in one place by 2026. A separate email gets lost more often, especially on tight closing timelines.
One last thing
The single most common failure point isn't the upload itself — it's the file name. An inspector running five properties a week who saves every radon PDF as report.pdf or scan001.pdf will eventually attach the wrong result to the wrong closing, and that mistake surfaces at the worst possible moment: after the buyer's agent has already forwarded it to the lender. Rename the file with the address before it ever touches the upload button.
Related guides
- Radon testing timelines for Michigan home closings
- How to schedule a radon test before a home appraisal
- Best radon testing companies for real estate closings in Michigan